Wednesday, April 4, 2012

Clean, White Kitchen

I've been loving white kitchens for a while. And my kitchen was white enough, I thought. I figured I'd just update the hardware and call it a day. But, after a while, the cream cabinets started to feel dingy, so Bob and I set out to freshen things up.

We painted all the cabinets and the back splash in one marathon painting session. We removed all the cabinet doors and hardware on Friday night. We painting Saturday and Sunday. We gave the paint a bit of time to dry and reinstalled everything on Wednesday. Not too painful at all. We used a paint sprayer hooked up to an air compressor for the cabinet doors, and we used a foam roller and paint brush for everything else. So, we have hardly any brush strokes. Pretty fancy.

Here's how it looks now. Excuse the naked drawers, I have to do some hole-filling and drilling to fit the new pulls on. Here's what they look like, so you'll have to use your imagination to fill in the empty drawer fronts.
And without my hand in the way.
Before:
After:

Before:
After:
We still need to:
-replace fridge and dishwasher with stainless steel versions
-install drawer pulls
-paint or replace oven hood
-replace sink faucet with a brushed nickel one
-replace outlet and light switch covers with white

Paint Colors:
Cabinets - Lemon Edge Valspar
Back Splash - Ballet White Benjamin Moore

Wednesday, March 28, 2012

April Showers

These beautiful tulips that my wonderful husband got for me really brighten up my freshly painted windowsill on this rainy spring evening.

 Pictures of my newly painted kitchen coming soon! I'm just waiting on the cabinet hardware I ordered last weekend.

Monday, February 20, 2012

Tiny Noodle Soup

This recipe is an adaptations of this meal makeover from the discontinued, online magazine, Ready Made.

I made a few changes to the recipe to fit my pantry supplies and my tastes, and now it is my husband's favorite meal that I've ever made. I have been instructed to make a '50 batch' whenever I make this soup. (A 50 batch is like a double batch, but 50 times over instead of twice – yes, it's that good.)


First, dice ½ a medium onion, preferably red, but any color is fine. And cut up ¼ cup of carrots. Saute the onion and carrot in a medium saucepan over medium heat in a little olive oil or butter for 10 minutes.


Add 2 cups chicken broth and a handful of bite-size frozen green beans. Bring to a boil. Throw in some basil – about ½ tsp of dried basil should do. You can add some salt and pepper to taste as well.


Add ¾ cup orzo pasta and boil for 6 minutes


Add ¼ cup frozen corn and boil for another 3 minutes.

Reduce heat to low and add a little cheese wedge or some cream cheese. You can also throw in a little cream or milk if you have it handy. Simmer and stir the soup until it is nice and creamy – 1-2 minutes. This is supposed to be a thick soup, but if your soup is turning into sticky noodles, you might need to add a little more broth or water at this point.


Enjoy!!


Tiny Noodle Soup
2 servings

Ingredients:
½ medium onion, diced
¼ cup carrot, diced
1 tbsp olive oil or butter
2 cups chicken or vegetable broth
½ tsp dried basil
salt and pepper
handful frozen green beans cut into bite size pieces
¼ cup frozen corn
1 garlic and herb Laughing Cow cheese wedge or
2 tbsp cream cheese
1-3 tbsp cream or milk (optional)


Heat olive oil or butter in a medium sauce pan over medium heat. Add onion and carrot and saute for 10 minutes. Pour the chicken broth into pan, add green beans and bring to boil over high heat. Add orzo and boil for 6 minutes. Add corn and boil for an additional 3 minutes. Lower heat, add cheese and milk to mixture and simmer for a minute or two. Add broth or water as needed. Serve hot.  

Sunday, February 12, 2012

Valentine's Day Hearts


 Easy Valentine's Day Hearts

1. Make a heart template.
 2. Trace template onto cardstock. Cut out as many hearts as you want. 
3. Make lines using two straight edges - such as leftover cardstock.
4. Apply glue to the line. The same effect can be created using double-
sided tape or scrapbook adhesive.
5. Add glitter.
6. Let the hearts dry. 
7. Hang on a sting or on a pom-pom garland.

Saturday, February 11, 2012

It's Curtains for You

My master bedroom suffered from a case of the drearies. It has only two windows, a north-facing window, and an east-facing window. Outside both windows is heavily wooded. That makes for a pretty shady room. What makes for an even shadier room are the dark brown roman blinds the previous owner had installed. The room was pretty great for sleeping in, but not so great for the rest of the day. Something needed to change. My HOA says that I can't cut down all the trees on my lot, so it looks like the blinds will have to go. 

Luckily, I spotted this great fabric at a Crate and Barrel Outlet store. It was only $5 a yard! This pattern isn't for the faint of heart, but I love it! I wish I'd gotten more for a tablecloth for the kitchen table. Sadly, my fuchsia table will remain naked for the time being. But, my windows are fully clothed! And that's what we're here to talk about today. So, let's get to it.

First, I took down the old shades and threw them away. They were pretty ratty looking, so I didn't donate or sell them. Then, I figured out a good spot for the new curtain rods I got at Target. I placed them 3 inches outside the window molding and 7.5 inches down  from the 8 foot ceiling. I don't have a level, so I just measured a couple times and trusted my yard stick.

After I installed the rod, I used iron-on hem tape to make 1 inch hems on each side of the curtain to 'tuck in' the unattractive edges. I also threw a quick 1 inch hem into the top of my curtain to hide the raw edge.

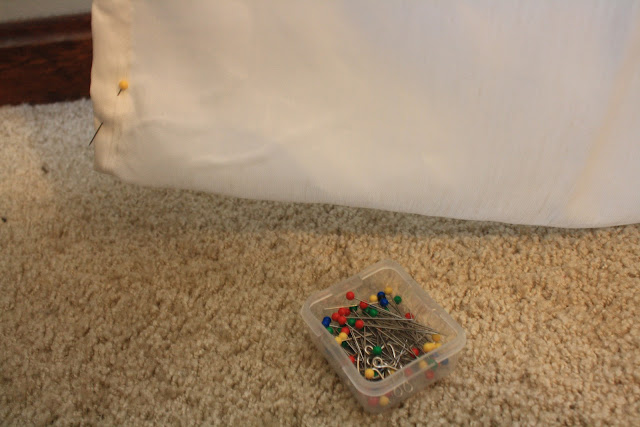
Then, I used some curtain rings to I hang it up. I measured how long I'd need the curtains to be by folding up the excess at the bottom and placing in a few pins to indicate how long the curtain should be.

Next, I took the curtain down and laid it on my ironing board. The pins ended up being 8 inches from the bottom of the fabric. I didn't want to cut off the excess fabric because I'll probably be taking these to my next home, and I want to be able to adjust the height if need be.

So, I folded over 4 inches and ironed the seam. Then, I folded that over 4 inches and ironed that seam as well. I sewed a line across at the hem to keep everything together.


After my curtain panel was done, I discovered that it didn't do much in the way of preventing people from looking into my bedroom. Call me old-fashioned, but I'm not the kind of person who enjoys putting on a show for the neighborhood every time I get changed.

Luckily, I had some Ritva curtains from Ikea waiting in the wings. So, I slapped those bad boys up on the curtain rods to measure how long they should be.

The curtains come with some iron-on hem tape, but I decided not to use it because I don't know if I'll want to alter the length somewhere down the road. So, I hemmed these the same way I did the curtain. Using my folding and pinning method, I discovered my curtains needed to be about 12” shorter. I intentionally made this backing curtain a little shorter than the panel so it wouldn't peak out at the bottom.

At my ironing table, I folded over 6” at the bottom and ironed, then I folded that over 6 inches and ironed again. Off to the sewing machine for a quick stitch across the bottom, and I was ready for hanging! Well, actually, I was ready to make another curtain for the other window, but then I was ready for hanging!

I think my little curtain making method worked out quite well for me. I'm sure when it comes to whipping up a curtain panel, there's more than one way to skin a cat (what a terrible saying), so use whatever method appeals to you the most. If you don't have a sewing machine, use iron-on hem tape or fabric glue. If, unlike me, you actually know how to use your sewing machine, sew away!

And don't get discouraged by fabric prices. It seems like people online are spending upwards of $50 a yard for curtain fabric. That can drain a wallet pretty quickly. Just keep your eyes peeled for fabric, and think outside of the box when it comes to colors and patterns -I'll even show you how to use a tablecloth as a curtain. I live sort of in the sticks, and I frequently come across inexpensive fabric that would make great curtains. This is especially true if you print out or otherwise obtain a 40% coupon to Joann Fabrics or Hobby Lobby. I've read that Joann's will take competitor coupons (like the 40% off coupons from Michael's), but I haven't tried it yet.

Do you have a window that could use a new curtain?  

Wednesday, February 1, 2012

Painting the Roses Red

Well, this post has nothing to do with roses or the color red, but it does involve a little painting.

I read Young House Love, like the rest of America, and these last couple weeks, the lovable couple that writes the blog started an initiative to get those little projects that they've been putting off done. AKA the "Dude, Get On That Already" Challenge. So, I thought I'd jump on the bandwagon and give it a try too.

My biggest area of procrastination is painting. I tend to start projects and then finish them up...months later. I don't mean to brag, but I'm pretty great at procrastinating.

So, here's how my little project started.

This half wall between my living room and kitchen had many large holes that had been patched up quite poorly by the previous owner, and it was an unattractive shade of mustard. I set about to remedy both woes.

First, I used my electric sander with a fine grit paper to smooth out the patch jobs. Then, I filled in some of the holes that my sander made – oops. Be careful if you ever decide to take your sander to the wall. I am guessing this is something that Bob Villa would not recommend.

Then, I rolled some water-based primer over the whole thing and finished up with a couple coats of the wall color. I decided to paint this wall the same color as all the other walls. I like accent walls in other peoples' homes, but for some reason, they don't jive with me in my own house. Go figure.

Here's the end result! I'm still working on painting all the trim white. Given my tendency to put things off, I will have my 'after' pictures available for you in mid to late 2018. 

Do you have any projects you've been putting off? Were you waiting for a little push or reminder to get to it?


Monday, January 23, 2012

The First Wreath of 2012


I saw this wreath in the Sweet Paul magazine, and I thought it was a great idea for a free, diy wreath. So, I picked out some paper and warmed up my scissors for a whole lot of leaf cutting.
Sweet Paul

Unfortunately, I forgot to take pictures while I was putting the wreath together. Luckily, this is a very simple project that you can probably do a number of ways. Here's how I put mine together.

Step one:
Select your paper. I laid out a few different color schemes based on the paper I already had. I thought these blues with white were wintery. Plus, my 24 pack of Martha Stewart glitter has all these colors.

Step two:
Make a template leaf. Figure out the size and shape you'd like.

Step three:
Either trace out your leaf template 40 or 50 time, or just do it the way I did (aka the impatient method) and use the template as a cutting guide. I held the template on the paper to be cut in one hand and cut around the template using my scissors in the other hand. It worked out surprisingly well.

Step four:
Add glitter to some or all of the leaves. This step is optional, of course, but come on, you know you want to.


Step five:
Buy a cardboard wreath form or cut one out of an old box. I opted for the latter. My wreath is almost a foot in diameter, for reference.

Step six:
Once the glitter is dry on your leaves, use your glue gun or school glue or whatever you have on hand to start putting down leaves. My method was to glue down the first leaf just at the 'base' of the leaf (the opposite of the pointy side of the leaf), then I tucked the next leaf under the first one to hide the 'base' of the second leaf. I just alternated colors, angles and glittering of the leaves as I went around. When I had my wreath filled in, I went back and secured the tips of the leaves with a little more glue.

Step seven:
Glue a ribbon to the back of the wreath form to hang it. Voila! An inexpensive treat for you to see every time you walk in your front door – or wherever you decide to hang it.

Isn't Mother Nature great? We've had hardly any snow at all this winter, but she sent down a few flurries just in time for this picture.