Thursday, November 8, 2012

Prevent the Holiday Light Tangle

Whenever I think of pulling the holiday lights out of the box to sort through and hang, I always picture that scene from Christmas Vacation with the humongous knot of lights that Rusty has to sort through. In the movie, it is a welcome respite from spending time indoors with the extended family, but in real life, it's just a headache.


Now, every holiday is getting a string of lights. I have orange lights for Halloween and so many Christmas lights, and I'm sure it's only a matter of time until Valentine's Day, Saint Patrick's Day and the Fourth of July get in on the action too. I need a way to store them all without making myself crazy.

I got this idea from the way my dad has stored his Christmas lights for years. He would wrap the strands around the box the lights came in. I decided it'd be a good idea to do the same, but I ran into a few problems. First of all, for the most part, lights don't come in long, thin boxes any longer, and if they do, the boxes are really flimsy. And secondly, I move a lot, and the lights get all jumbled and end up falling off their boxes and into a big mess in the holiday tub. So, I tried to fix those problems by using some spare corrugated cardboard and some scissors.

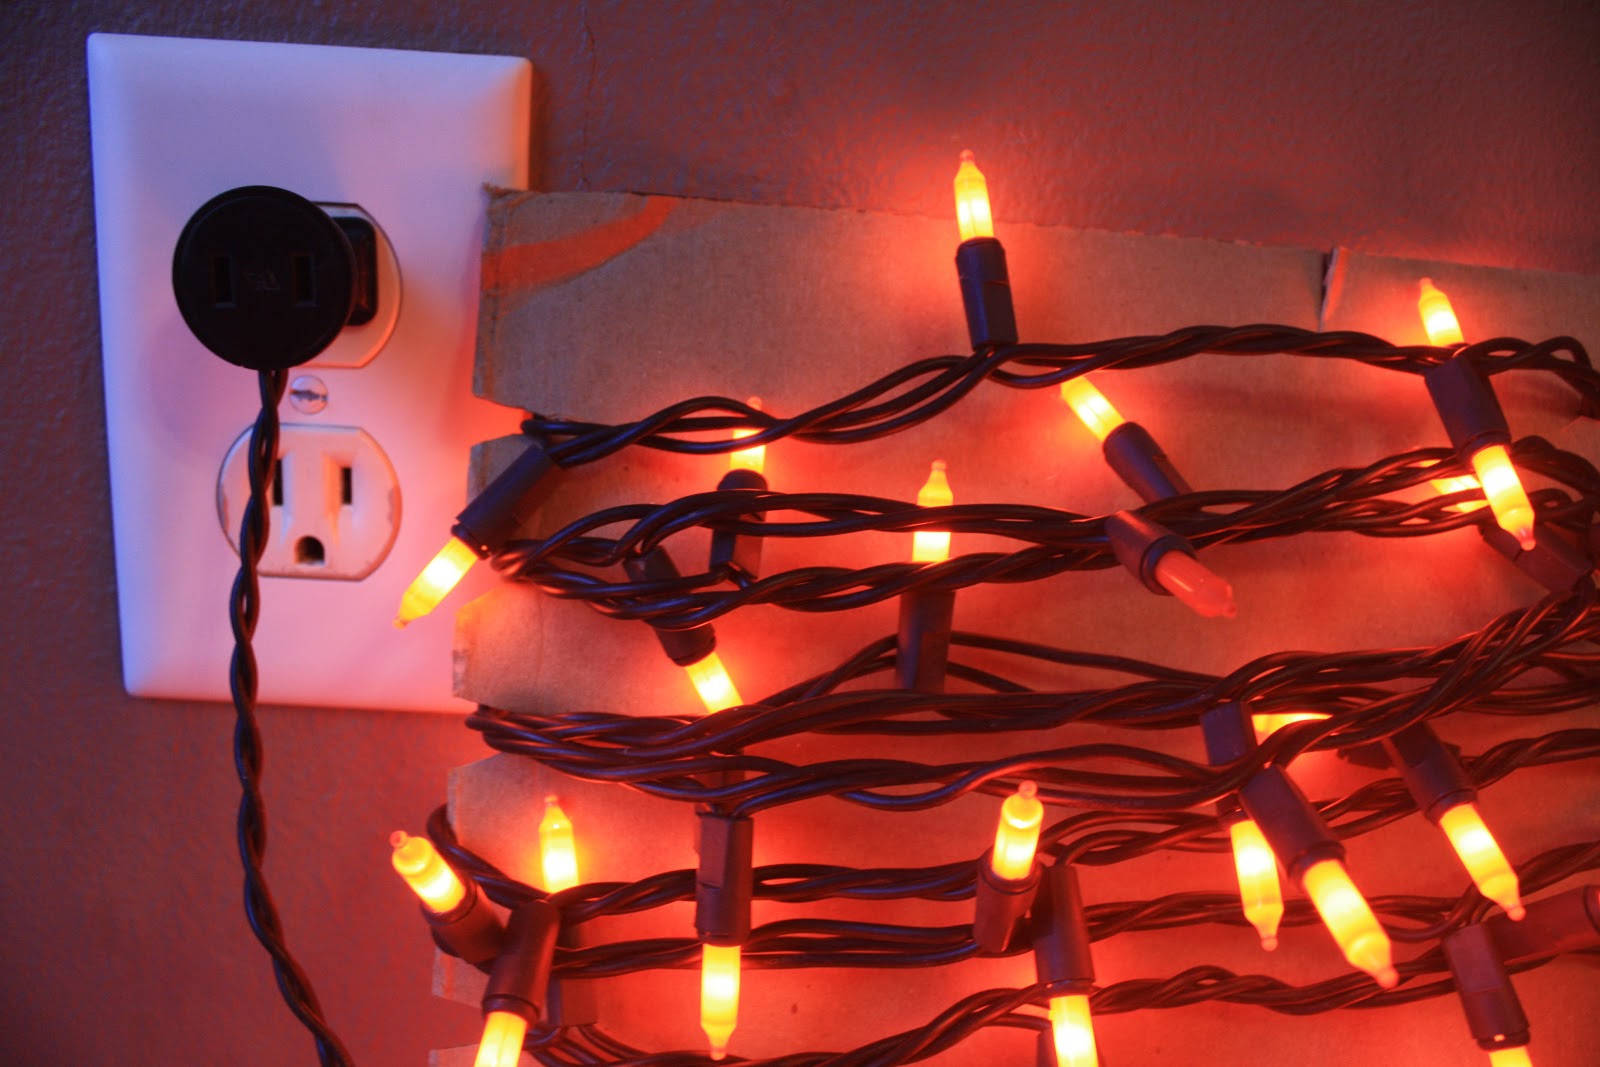
First, you start at one end by making a slit with a notch at the end. This is where you will start your cord. (I got the idea to do the post after I already got started - hence the lights wrapped around the board.)


Then, make triangular notches the length of the board at whatever interval you like. I did a notch about every inch. I think making the whole edge notched is a good idea, but I didn't think of it til I was done. Now you just wrap your lights down the length of your board. Be careful that you don't overlap too much because you'll end up with a tangle when you take them off later.


The handy thing about his method is that you can pull your lights out of storage, plug them in and see if you have any bad bulbs or strands. 

You can easily see in the picture there is one orange bulb that needs to be replaced.

If you have your lights all jumbled together, it's almost impossible to see dead lights or to figure out which strand has gone bad. I find it's easier (it will never be easy) to check each bulb on a bad strand without everything getting tangled up. I also store the extra bulbs taped to the board. That way you know which strand they belong to, and you can make easy repairs.

Now your lights are ready for storage until next year.


Wednesday, November 7, 2012

Unstuck a Candle

Quick Tip:


If you need to get a candle out of its container, just pop it in the freezer for a few hours. 
The wax shrinks and falls right out.

Sunday, May 13, 2012

Stuffed Zucchini


This one is tasty and very versatile. Basically, you just scoop the innards out of a zucchini and add whatever suits your fancy and then heat it all up. I adapted this recipe to fit my needs and pantry supplies on any given night.

For tonight, I wasn't really in a cooking mood, so I did a very uncomplicated version. Here it is! Fancy it up any way you like. I put some other possible ingredients at the bottom of the post. 

Wash the zucchini and cut off the ends. 

Slice down the middle and scoop the seeds out by dragging a spoon down the middle of the zucchini. You can use the stuff you scooped out in your stuffing if you feel like it or toss it. It's your call, but be aware that some of the big zucchinis can have some tough, old seeds inside them. 


Then, what I did was melt about a ½ tablespoon butter and mix it with bread crumbs, a little parmesan cheese, and a few sprinkles of basil, cayenne, garlic, salt, and pepper. 


We grilled our zucchini tonight, but you can just stick it under the broiler or in the oven until the zucchinis are a little soft and the topping is brown – about 10-20 minutes.


Possible Adaptations:
-cream cheese
-tomato
-cheddar
-parsley
-onion
-thyme
-paprika
-mozzarella
-bacon
-whatever your heart desires, go crazy


Saturday, May 12, 2012

German Apple Pancake


I love an easy and tasty breakfast. In the morning, I wake up hungry and angry (also known as hangry) – I need food, and I need it now! Yeah, I'm one of those people. 

I end up saying this to my husband on a nearly daily basis.

Someecards

So, how to get tasty breakfast on the table stat? Stumble into the kitchen, cut up some apples, dump them in a pan. Cook. Dump in some more ingredients and bake. Other than cutting up a couple apples, this recipe is a snap. And did I mention tasty? So good! I edited a recipe I found on Allrecipes.com to suit my liking. Hope it works for you!

German Apple Pancake


Set your oven to 425F and set your cast iron skillet on medium heat.

Peel, core and slice two large tart apples. Butter your skillet and arrange the apples in a single layer.

Sprinkle 1 tablespoon brown sugar, ½ teaspoon cinnamon (or more to your liking), ½ teaspoon nutmeg over the apples. Saute for a few minutes until the mixture starts bubbling.

In the mean time, mix you dry ingredients. ½ cup all-purpose flour, ¼ cup wheat flour, ½ teaspoon baking powder, 1 tablespoon brown sugar, and a pinch of salt


Combine wet ingredients and mix with dry ingredients. 1 teaspoon vanilla, 3 eggs, 2 tablespoons melted butter, ½ teaspoon nutmeg, ½ teaspoon cinnamon, 1 cup milk


Pour the batter in the skillet evenly covering the apples. Pop the whole thing in the oven for 15 minutes.
It gets all puffy after a bit in the oven

After 15 minutes, reduce the heat to 375F and cook for another 10 minutes.
This raises the question: Was I cooking breakfast at 11:30? or did I set my timer wrong? 

Remove from oven and flip pancake onto the serving platter. Cut your pancake into wedges, and it's meal time!
I use a pizza cutter whenever possible. It's especially handy for this. 

Yum!!


Wednesday, April 4, 2012

Clean, White Kitchen

I've been loving white kitchens for a while. And my kitchen was white enough, I thought. I figured I'd just update the hardware and call it a day. But, after a while, the cream cabinets started to feel dingy, so Bob and I set out to freshen things up.

We painted all the cabinets and the back splash in one marathon painting session. We removed all the cabinet doors and hardware on Friday night. We painting Saturday and Sunday. We gave the paint a bit of time to dry and reinstalled everything on Wednesday. Not too painful at all. We used a paint sprayer hooked up to an air compressor for the cabinet doors, and we used a foam roller and paint brush for everything else. So, we have hardly any brush strokes. Pretty fancy.

Here's how it looks now. Excuse the naked drawers, I have to do some hole-filling and drilling to fit the new pulls on. Here's what they look like, so you'll have to use your imagination to fill in the empty drawer fronts.
And without my hand in the way.
Before:
After:

Before:
After:
We still need to:
-replace fridge and dishwasher with stainless steel versions
-install drawer pulls
-paint or replace oven hood
-replace sink faucet with a brushed nickel one
-replace outlet and light switch covers with white

Paint Colors:
Cabinets - Lemon Edge Valspar
Back Splash - Ballet White Benjamin Moore

Wednesday, March 28, 2012

April Showers

These beautiful tulips that my wonderful husband got for me really brighten up my freshly painted windowsill on this rainy spring evening.

 Pictures of my newly painted kitchen coming soon! I'm just waiting on the cabinet hardware I ordered last weekend.

Monday, February 20, 2012

Tiny Noodle Soup

This recipe is an adaptations of this meal makeover from the discontinued, online magazine, Ready Made.

I made a few changes to the recipe to fit my pantry supplies and my tastes, and now it is my husband's favorite meal that I've ever made. I have been instructed to make a '50 batch' whenever I make this soup. (A 50 batch is like a double batch, but 50 times over instead of twice – yes, it's that good.)


First, dice ½ a medium onion, preferably red, but any color is fine. And cut up ¼ cup of carrots. Saute the onion and carrot in a medium saucepan over medium heat in a little olive oil or butter for 10 minutes.


Add 2 cups chicken broth and a handful of bite-size frozen green beans. Bring to a boil. Throw in some basil – about ½ tsp of dried basil should do. You can add some salt and pepper to taste as well.


Add ¾ cup orzo pasta and boil for 6 minutes


Add ¼ cup frozen corn and boil for another 3 minutes.

Reduce heat to low and add a little cheese wedge or some cream cheese. You can also throw in a little cream or milk if you have it handy. Simmer and stir the soup until it is nice and creamy – 1-2 minutes. This is supposed to be a thick soup, but if your soup is turning into sticky noodles, you might need to add a little more broth or water at this point.


Enjoy!!


Tiny Noodle Soup
2 servings

Ingredients:
½ medium onion, diced
¼ cup carrot, diced
1 tbsp olive oil or butter
2 cups chicken or vegetable broth
½ tsp dried basil
salt and pepper
handful frozen green beans cut into bite size pieces
¼ cup frozen corn
1 garlic and herb Laughing Cow cheese wedge or
2 tbsp cream cheese
1-3 tbsp cream or milk (optional)


Heat olive oil or butter in a medium sauce pan over medium heat. Add onion and carrot and saute for 10 minutes. Pour the chicken broth into pan, add green beans and bring to boil over high heat. Add orzo and boil for 6 minutes. Add corn and boil for an additional 3 minutes. Lower heat, add cheese and milk to mixture and simmer for a minute or two. Add broth or water as needed. Serve hot.  

Sunday, February 12, 2012

Valentine's Day Hearts


 Easy Valentine's Day Hearts

1. Make a heart template.
 2. Trace template onto cardstock. Cut out as many hearts as you want. 
3. Make lines using two straight edges - such as leftover cardstock.
4. Apply glue to the line. The same effect can be created using double-
sided tape or scrapbook adhesive.
5. Add glitter.
6. Let the hearts dry. 
7. Hang on a sting or on a pom-pom garland.

Saturday, February 11, 2012

It's Curtains for You

My master bedroom suffered from a case of the drearies. It has only two windows, a north-facing window, and an east-facing window. Outside both windows is heavily wooded. That makes for a pretty shady room. What makes for an even shadier room are the dark brown roman blinds the previous owner had installed. The room was pretty great for sleeping in, but not so great for the rest of the day. Something needed to change. My HOA says that I can't cut down all the trees on my lot, so it looks like the blinds will have to go. 

Luckily, I spotted this great fabric at a Crate and Barrel Outlet store. It was only $5 a yard! This pattern isn't for the faint of heart, but I love it! I wish I'd gotten more for a tablecloth for the kitchen table. Sadly, my fuchsia table will remain naked for the time being. But, my windows are fully clothed! And that's what we're here to talk about today. So, let's get to it.

First, I took down the old shades and threw them away. They were pretty ratty looking, so I didn't donate or sell them. Then, I figured out a good spot for the new curtain rods I got at Target. I placed them 3 inches outside the window molding and 7.5 inches down  from the 8 foot ceiling. I don't have a level, so I just measured a couple times and trusted my yard stick.

After I installed the rod, I used iron-on hem tape to make 1 inch hems on each side of the curtain to 'tuck in' the unattractive edges. I also threw a quick 1 inch hem into the top of my curtain to hide the raw edge.

Then, I used some curtain rings to I hang it up. I measured how long I'd need the curtains to be by folding up the excess at the bottom and placing in a few pins to indicate how long the curtain should be.

Next, I took the curtain down and laid it on my ironing board. The pins ended up being 8 inches from the bottom of the fabric. I didn't want to cut off the excess fabric because I'll probably be taking these to my next home, and I want to be able to adjust the height if need be.

So, I folded over 4 inches and ironed the seam. Then, I folded that over 4 inches and ironed that seam as well. I sewed a line across at the hem to keep everything together.


After my curtain panel was done, I discovered that it didn't do much in the way of preventing people from looking into my bedroom. Call me old-fashioned, but I'm not the kind of person who enjoys putting on a show for the neighborhood every time I get changed.

Luckily, I had some Ritva curtains from Ikea waiting in the wings. So, I slapped those bad boys up on the curtain rods to measure how long they should be.

The curtains come with some iron-on hem tape, but I decided not to use it because I don't know if I'll want to alter the length somewhere down the road. So, I hemmed these the same way I did the curtain. Using my folding and pinning method, I discovered my curtains needed to be about 12” shorter. I intentionally made this backing curtain a little shorter than the panel so it wouldn't peak out at the bottom.

At my ironing table, I folded over 6” at the bottom and ironed, then I folded that over 6 inches and ironed again. Off to the sewing machine for a quick stitch across the bottom, and I was ready for hanging! Well, actually, I was ready to make another curtain for the other window, but then I was ready for hanging!

I think my little curtain making method worked out quite well for me. I'm sure when it comes to whipping up a curtain panel, there's more than one way to skin a cat (what a terrible saying), so use whatever method appeals to you the most. If you don't have a sewing machine, use iron-on hem tape or fabric glue. If, unlike me, you actually know how to use your sewing machine, sew away!

And don't get discouraged by fabric prices. It seems like people online are spending upwards of $50 a yard for curtain fabric. That can drain a wallet pretty quickly. Just keep your eyes peeled for fabric, and think outside of the box when it comes to colors and patterns -I'll even show you how to use a tablecloth as a curtain. I live sort of in the sticks, and I frequently come across inexpensive fabric that would make great curtains. This is especially true if you print out or otherwise obtain a 40% coupon to Joann Fabrics or Hobby Lobby. I've read that Joann's will take competitor coupons (like the 40% off coupons from Michael's), but I haven't tried it yet.

Do you have a window that could use a new curtain?